Timber floors are popular across the Gold Coast because they add warmth and natural beauty to modern and traditional homes alike. But when you’re renovating areas like the kitchen, bathroom, or living areas, a common question comes up: when’s the best time to sand and polish your timber floors? It might seem like a small detail in a big project, but getting the wrong timing can lead to scratched finishes, extra costs, or delays. In this post, we’ll cover the pros and cons of sanding before or after a renovation, share expert advice, and decide what’s best for your specific renovation project.
Sanding Floors Before a Kitchen or Bathroom Renovation
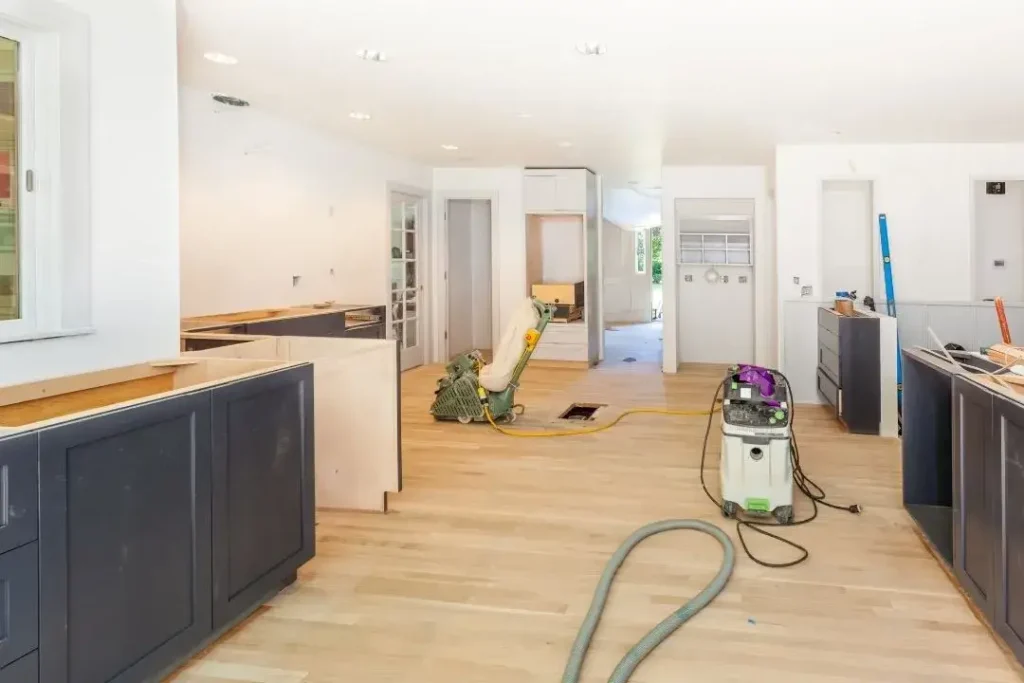
Some homeowners choose to sand and polish their timber floors before the renovation begins. This can make the site cleaner and more workable for other trades, especially if the flooring is being restored across one-plan areas.
Pros:
- Clean, level surfaces for trades. Freshly sanded floors create a smooth base for cabinet installers, plumbers, and other trades to work on, helping with precise alignment and installation.
- Full access to floor edges. With cabinetry, vanities, or kitchen islands not yet in place, flooring professionals can sand and coat all the way to the wall, leaving no hidden or unfinished areas.
- Less risk to new fixtures. Completing the floors first avoids the possibility of dust or sanding debris damaging brand-new fittings or paintwork.
Cons:
- High risk of surface damage. During a renovation, floors are vulnerable to dropped tools, heavy foot traffic, spills, and scratches, especially if multiple trades keep coming through the space.
- Possible rework required. Even with floor protection in place, some areas may get marked or scratched and need touch-ups or, in worse cases, another full sand and coat.
Sanding Floors After a Kitchen or Bathroom Renovation
Many flooring professionals recommend sanding and polishing timber floors after the bulk of the renovation work is done. This approach reduces the chance of damage and ensures the final finish stays clean and pristine.
Pros:
- Protects the floor finish. With demolition, construction, and installation out of the way, there’s less risk of damaging the freshly finished surface.
- Polish looks fresher for longer. The final sanding and coating can be timed right before you move back in or furnish the space, giving your floors a clean and polished look.
Cons:
- Restricted access in tight areas. Once fixed cabinetry, kitchen islands, bathroom vanities or other inbuilt cabinetry are installed, it becomes difficult or near impossible to reach all the way to the edges with the sanding equipment.
- Extra prep work. Cabinets and skirting boards may need to be masked or protected during the sanding process to avoid dust settling into cracks or polish splashing onto new finishes.
- Inaccessible sections remain unfinished. Any areas hidden beneath permanent fixtures will not be sanded or sealed, which is not a big deal since it’s not visible but it may bother some homeowners who want consistency under every surface.
Best Approach: What Do the Experts Recommend?
The ideal timing for floor sanding depends on the type of renovation you’re undertaking and how your space is laid out. Most flooring professionals recommend sanding and polishing timber floors as one of the final steps, after the messy work is done, but before painting and furnishing.

For Kitchens
Install all cabinetry and appliances first, then sand and polish the floors. This protects the finished surface from potential damage during the build and ensures a clean result around the base of cabinets and kickboards. If you’re planning to install floating cabinetry or large kitchen islands, your flooring contractor can advise whether partial sanding beforehand is necessary.
For Bathrooms
Most bathrooms use tiles or waterproof vinyl, but in some homes, timber flooring still features in the bathroom. Suppose your bathroom renovation on the Gold Coast includes timber floors. In that case, sanding should be done after waterproofing is complete but before the final fixtures, such as the toilet or vanity, are installed.
For Major Renovations
If you’re knocking down walls, replacing plumbing, or doing structural work, it’s best to wait until all the heavy trades are done. Schedule floor sanding after construction is complete but before painting, touch-ups, or final detailing. This gives you the best chance of a flawless finish with minimal risk of damage or dust contamination.
Practical Tips & Advice
No matter when you choose to sand your timber floors, a bit of planning goes a long way toward protecting the finish and keeping your renovation on track. Here are some practical tips to help you avoid setbacks:

- Use protective floor coverings. If sanding happens early in the project, cover the floors with durable materials like Ram Board, masonite, or hardboard to shield them from damage during cabinetry installation or other trade work.
- Coordinate with all trades. Make sure your flooring contractor, builder, and any other trades are on the same page. Clear communication helps avoid accidental damage or scheduling clashes that could push the project back.
- Leave the final coats until last. If you need to sand before renovations are complete, consider applying only the base coats first. Then, return for the final polish once all the messy work is done for a fresh, unblemished finish.
- Account for curing time. Timber floor finishes need time to fully cure, usually 24 to 72 hours, depending on the product used. Plan for downtime before walking on the surface or moving furniture back on.
Additional Considerations
Every renovation is different, and a few extra factors might influence when you decide to sand and polish your timber floors.
Scope of Renovation
For full gut renovations, it’s usually safer to sand at the end after demolition and construction is finished. For light updates like replacing cabinet doors or fittings, floor sanding can be done earlier with less risk.
Condition of Existing Timber Floors
If your floors are scratched, stained, or uneven, it’s a good idea to assess their condition before the renovation begins. Surface wear, cupping, or movement may suggest that resurfacing is needed. You can check for early signs of damage before deciding when to schedule the sanding.
Budget and Timeline
Planning the timing carefully can help avoid double-handling, resanding, or extra call-outs, all of which add to your costs. A well-sequenced renovation keeps your project running smoothly and protects your investment in both flooring and fixtures.

Timing Floor Sanding Right for a Smoother Renovation
Sanding timber floors after a renovation is usually the safest choice if you’re aiming for a flawless finish, but it’s not always the most practical option. Depending on your renovation scope, layout, and timeline, it may make more sense to sand earlier, especially if large fixtures are being installed or repairs are needed beneath the surface. The best approach is to plan ahead and speak with both your renovation builder and flooring contractor. A coordinated schedule can help you avoid damage, reduce costs, and ensure your timber floors look their best once the project wraps up.
Need advice on how to time your floor sanding around a kitchen or bathroom renovation on the Gold Coast? Whether you’re restoring heritage boards or planning a high-end kitchen upgrade, we handle everything from standard finishes to hardwood floor sanding in Broadbeach and other Gold Coast suburbs. Get in touch with our team today for expert recommendations and a free quote. We’ll make sure your timber floors are finished beautifully and at the right stage of your renovation.